• About
  • Social Media
  • DIY
  • Holidays
  • Travel
  • Lifestyle

Staying Home Sawyer

Real Life Living on a Real Life Budget

Birthday's, DIY, Party Planning

Birthday Banner

6.18.2014

Birthday Hat Banner // DIY // Birthday DecorationsIt’s birthday time again!! B turned 34 last week, and I tried very hard to make his birthday as special as he made mine. I think I did fairly well, if judging by the look on his face when he found all my surprises. Needless to say, I’m a little better at surprising him than he is me. But instead of admitting this, he blames me for being intuitive. What can a girl do?

Disclaimer: I didn’t come up with this hat banner on my own. I searched Pinterest for a while looking for adult birthday surprise ideas, and really came up empty handed. Then I saw this cute little birthday face banner, (you can find it here: From Dahlias To Doxies), made with different faces of the same baby from the previous year. Well, I could turn this into an adult surprise! Especially because my husband is notorious for making funny photos in our pictures (the duck face is questionable?!).

The blog above gives much better instructions, but I’ll give it a quick overview. Visit her blog to see her banner and for detailed instructions.

1. Gather the photos (on the computer) that you want to use.

2. Open Microsoft Word, insert ALL photos into the document. I also changed my margins to be “narrow,” but you don’t have to do this if you’re not sure how. Tip: Top tool bar, open “Page Layout.” Click on “Margins” and select the “Narrow” option.

3. Use the photo editor to crop all photos down to just the face.

4. I pulled corners of photos to make them all roughly the same size. They won’t all be exactly the same size, but it doesn’t matter.

5. Print in black & white for good effect.Birthday Hat Banner // DIY // Birthday Decorations

To make the hats, I just cut random triangle sizes out of 12×12 scrapbook paper pages. Then I glue-sticked (yeah I just made that a word) them to the top of B’s heads. I just used crepe paper, two layers, cut the fringe into each side, glued to the hat, and fluffed for effect! I used curling ribbon, taped each head to the back, and strung it all together.  I added a little extra ribbon to each end so it looked a little better (and printed off his name beneath), and it turned out super cute!Birthday Hat Banner // DIY // Birthday Decorations

Share this:

  • Email a link to a friend (Opens in new window) Email
  • Print (Opens in new window) Print
  • Tweet

Like this:

Like Loading…
DIY, Lifestyle

Rae of Sunshine!

6.10.2014

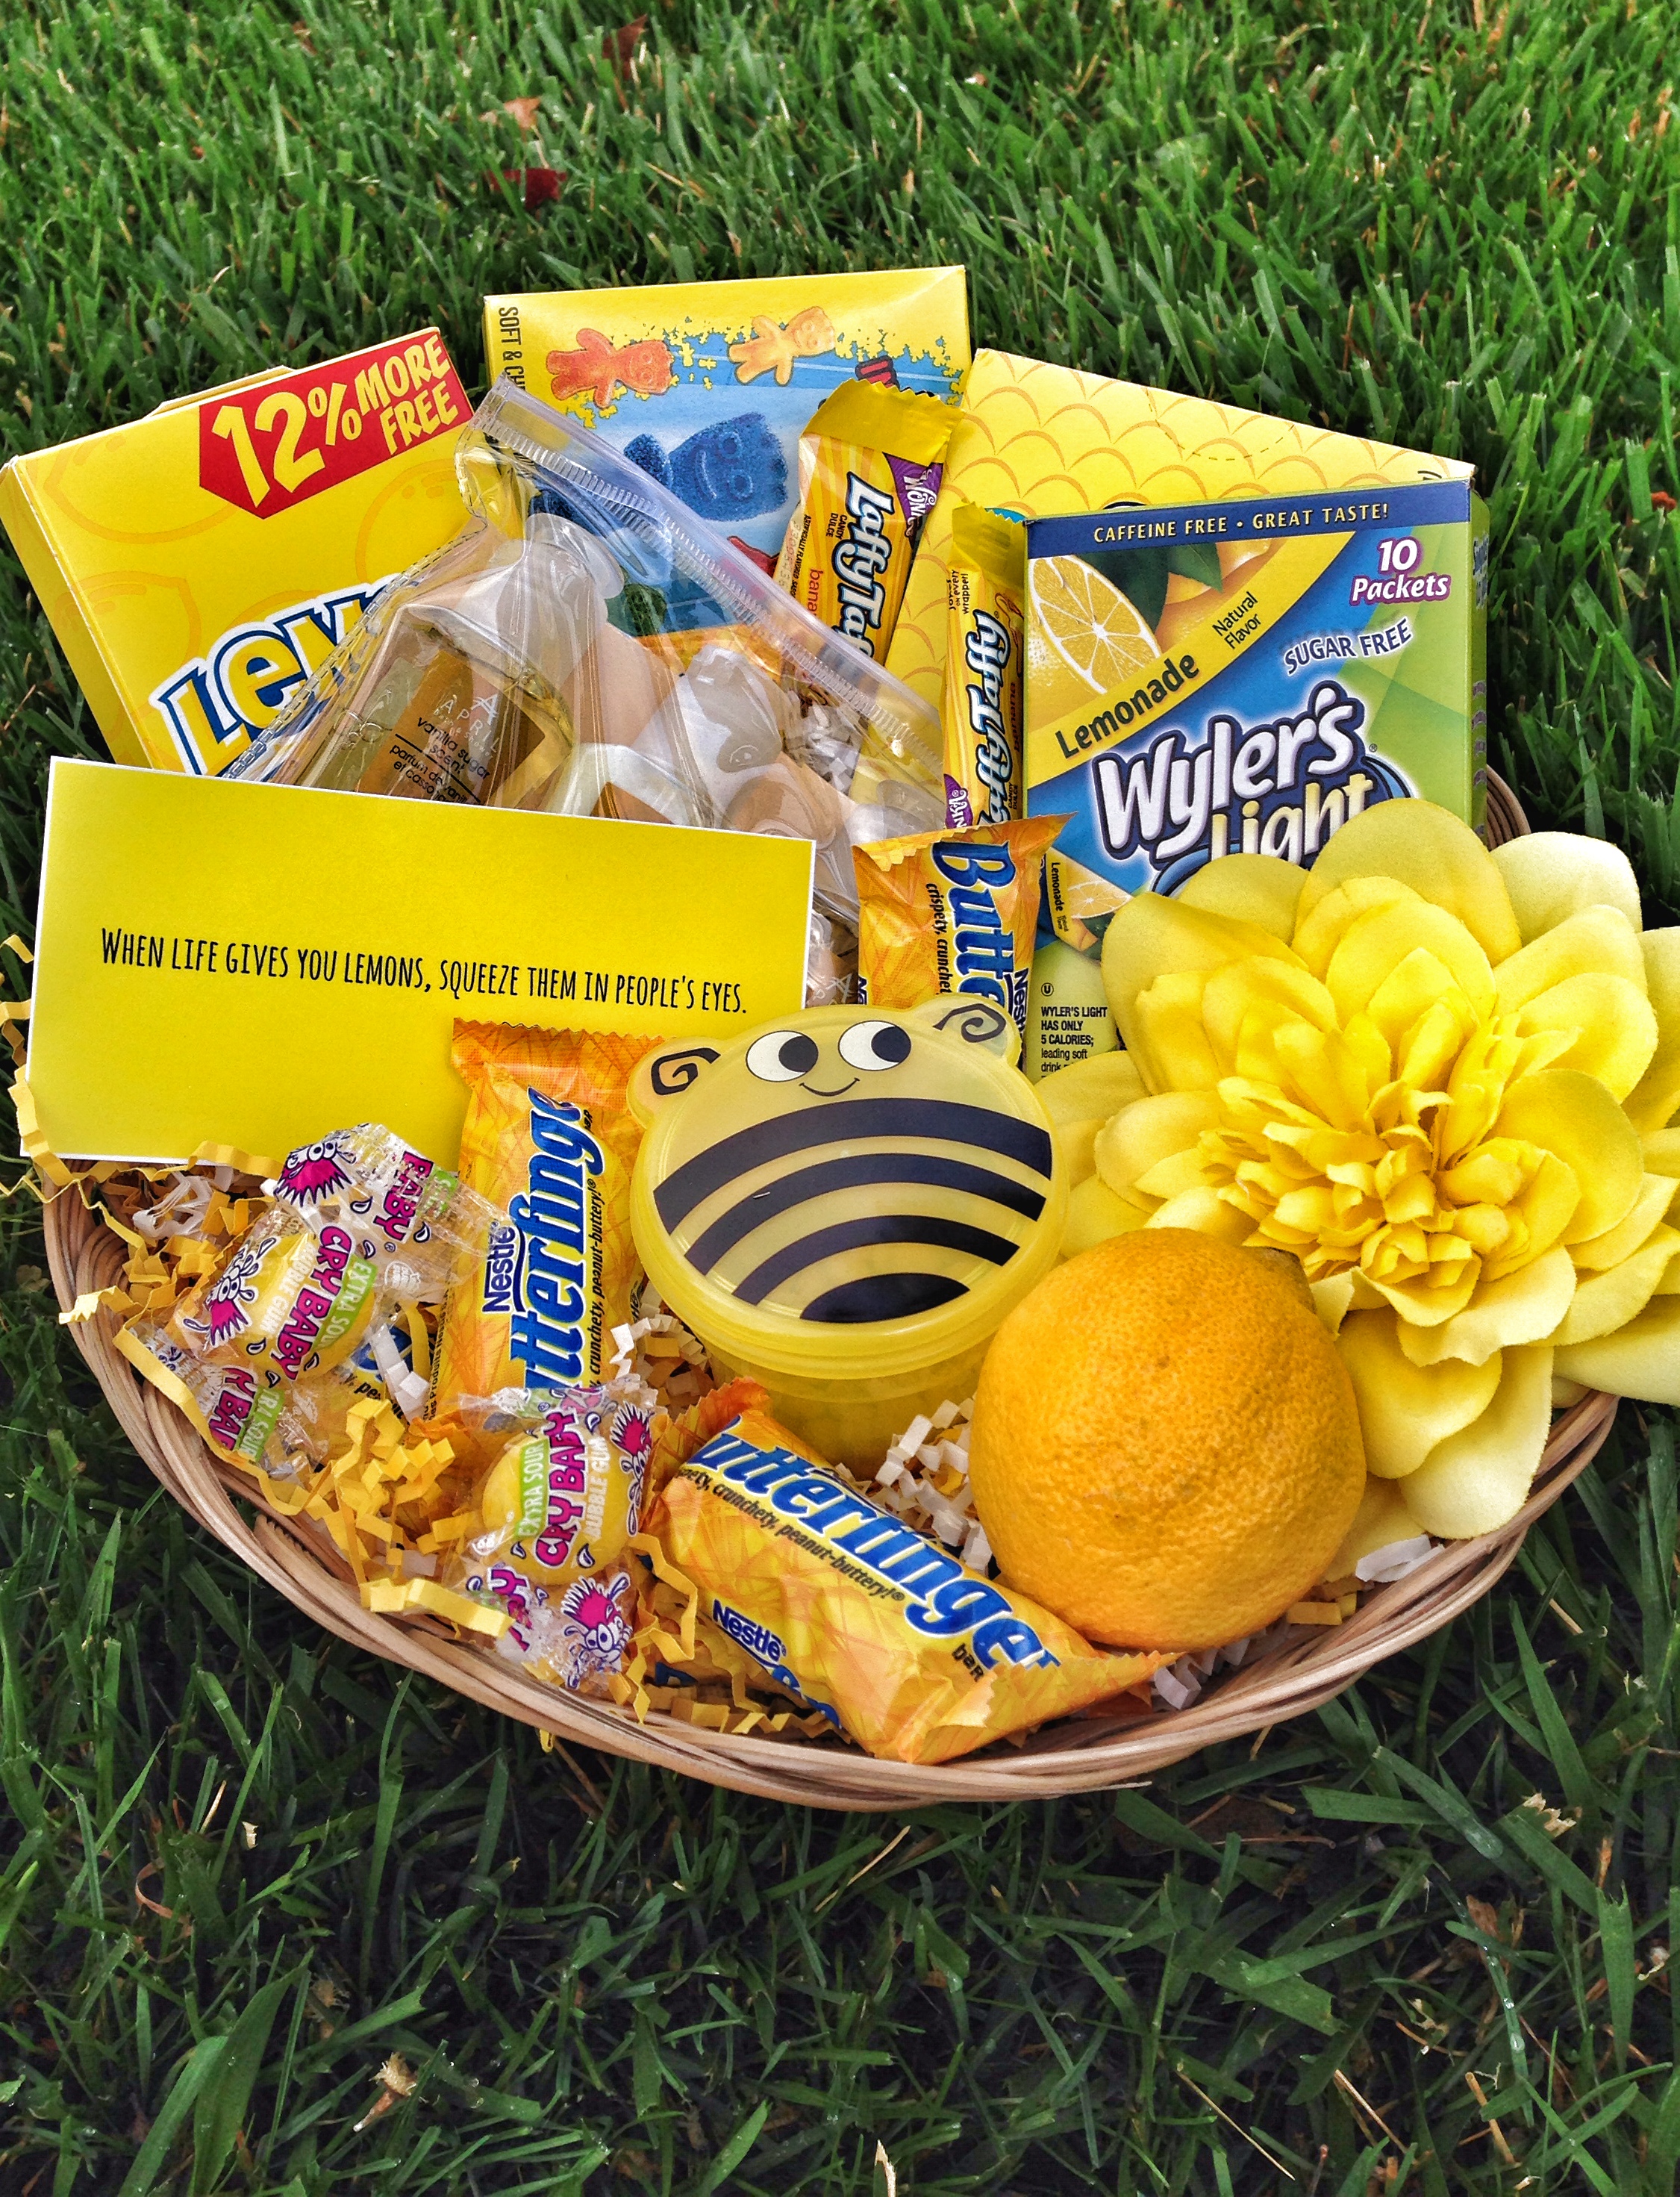
Box of Sunshine // Free Printable // Rae of SparklesI may be known as a Rae of Sparkles now, but I used to be a Rae of Sunshine. According to my parents anyway. Which is great, because it fits in perfectly with my blog post. How coincidental is that? I also love that my middle name inspires me to be creative. Who else can say that? Thank you parents for not naming me after my great grandma Gertrude. Or handing down my mother’s real name. Just saying (I love you mom). She’s much more fun than a Roberta could ever be anyway. That’s why we call her Bobbie. Thankfully, my mom wasn’t out for revenge when she named me. I got lucky.

It may come as a surprise to some, but I really like to send things in the mail. I know, shocker right? When I first started on Pinterest years ago, I saw an idea for a Box of Sunshine (now they’re everywhere!). Originally I just sent this to my sister who loves the color yellow, but then it escalated to sending to anyone going through a tough time. They are super easy to make, and you can really decide how much you want to spend on each (mine range from $10 – $20 plus shipping). I used my handy dandy $6 USPS Flat Rate box and went to work.

First, you’ll have to line the box with something yellow. I used decorative scrapbook paper, and use a different kind every time. You could also use construction paper or even wrapping paper. Whatever floats your boat. A good Modge Podge or glue can secure it down for you. Then fill the box with a filling, I got mine at the Dollar Tree in the gift wrap section (You could also use Easter grass for this as well). Then print these free printables I created, and glue them wherever you’d like: Box of Sunshine Printables. You could also use one of these as the front of a note card for the box!Box of Sunshine // Free Printable // Rae of Sparkles

Onto the fun part: finding fillers! The Dollar Tree is always my favorite place for this, but Michael’s dollar bins or Target’s Dollar Spot are two good locations to find goodies as well. I recently found an inflatable sun at the Dollar Tree (see below) that made the PERFECT addition to my boxes! I bought a ton obviously.  Another good spot, if you’d like some random candies, is the candy stores that sell candy by the pound. You can pick out the yellowcandy from any bin you’d like!

Some ideas:

Lemonheads

Peanut M&Ms

Juicy Fruit

Laffy Taffy

Mr. Goodbar

Butterfingers

Lemons/Lemonade Mix

Yellow nail polish

Decorative Pens

Decorative Note Pads/Cards

Carmex

StickersBox of Sunshine // What to Put Inside // Free Printable // Rae of Sparkles

To add a little extra flair, I take the candy out of the bags, and put them in little clear plastic bags. You can find these at Michael’s in all different sizes, I typically use the 3×4″ bags. Then use the free printable above to print off the “tags” for each bag. Simply cut out the word “Sunshine” or the single sun, fold half over each side of the baggie, and staple (see photos)!

I also add a card to my boxes, and I’ve added the photo below. It’s not hard to make, but I didn’t take pictures of steps so the photo is just for reference. I used a scalloped scissor to create the sun shape, and just used different textured paper for the back and middle.Box of Sunshine // Free Printable // Rae of Sparkles

I’ve created so many different versions of this box (and even in a basket form), and they all turn out differently. Just to give you a few extra ideas, here are a couple other’s I’ve made:

Box of Sunshine // Free Printable // Rae of SparklesBox of Sunshine // Free Printable // Rae of Sparkles

Share this:

  • Email a link to a friend (Opens in new window) Email
  • Print (Opens in new window) Print
  • Tweet

Like this:

Like Loading…
Birthday's, DIY

DIY Birthday Cards

6.06.2014

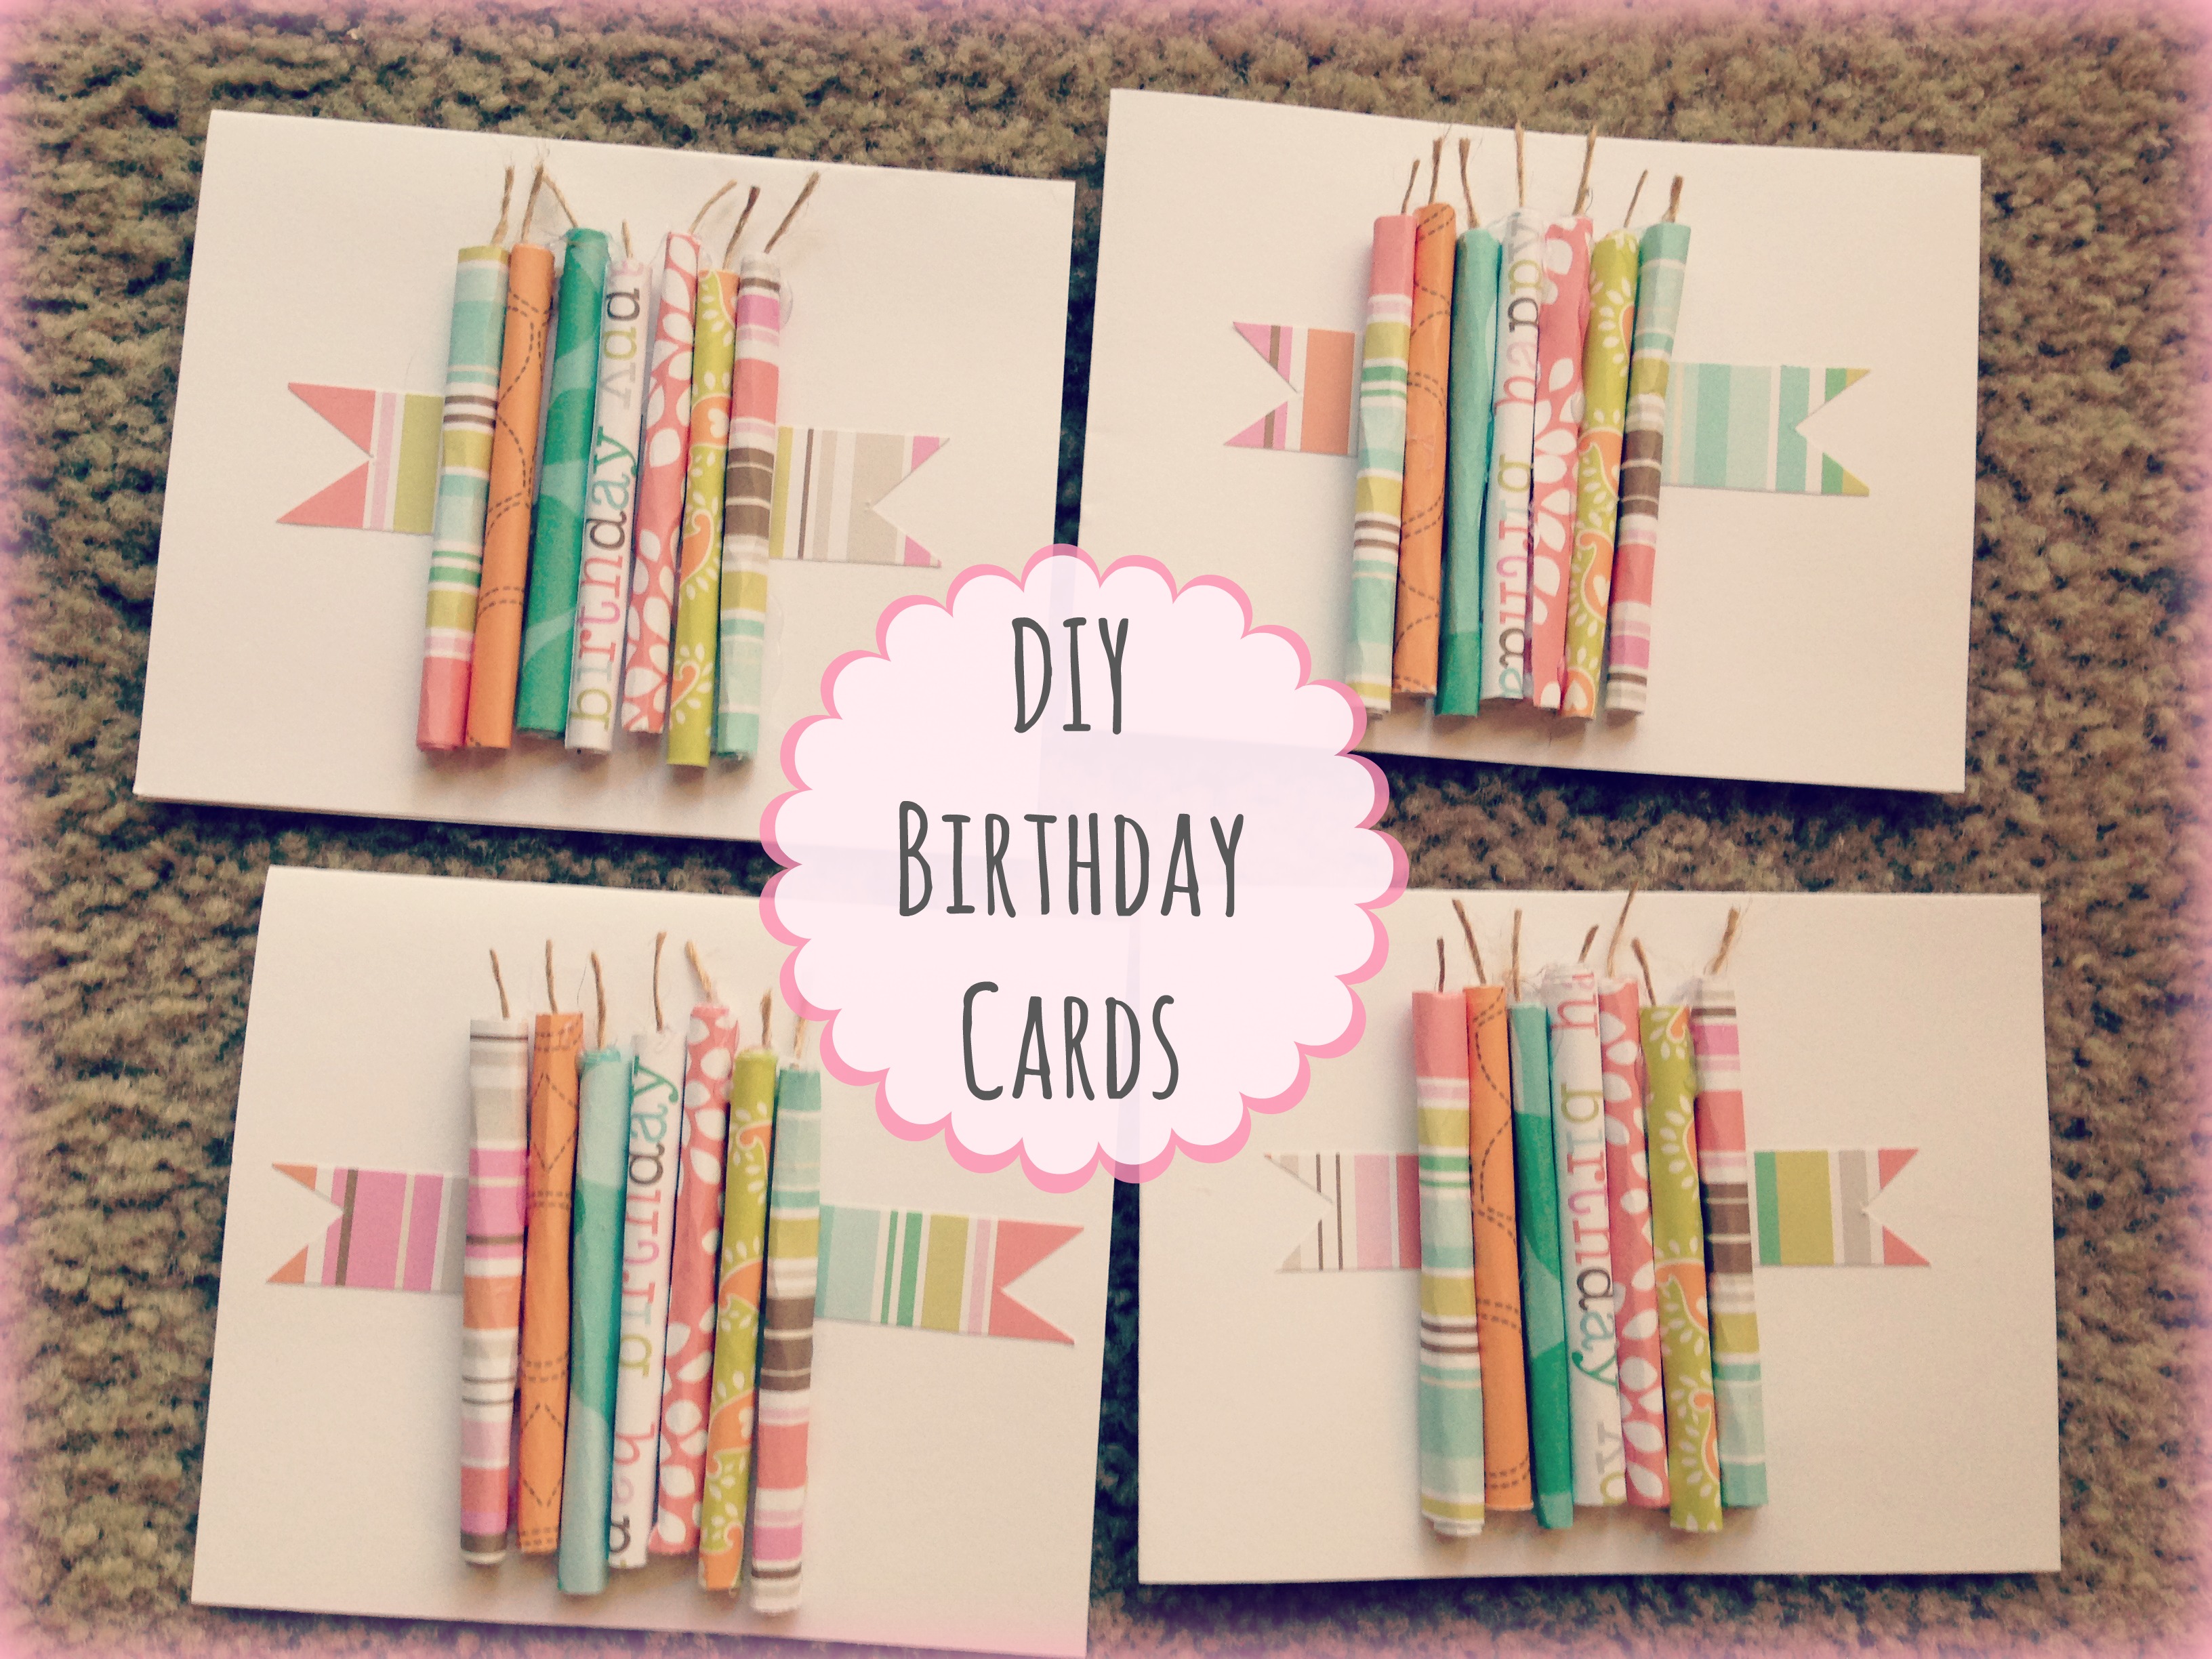
DIY Birthday Candle Cards // Birthday Cards // Rae of SparklesI decided this year, that I would try to send a birthday card to all of the important people in our lives (if you’re reading this, and you didn’t get one…maybe you’ll try a little harder next year…). So far, I’ve only missed one, and although he is a VIP in our lives, he was only turning two…so I think it’s fair to say I’m still in the running. Like he even knows when his birthday is.

Instead of buying all of the birthday cards, I decided to save a little money (and lose a little mind), and hand make a few. If you don’t receive one of the handmade ones, don’t feel bad. I paid good money for the store bought ones. $.50 is a lot right?

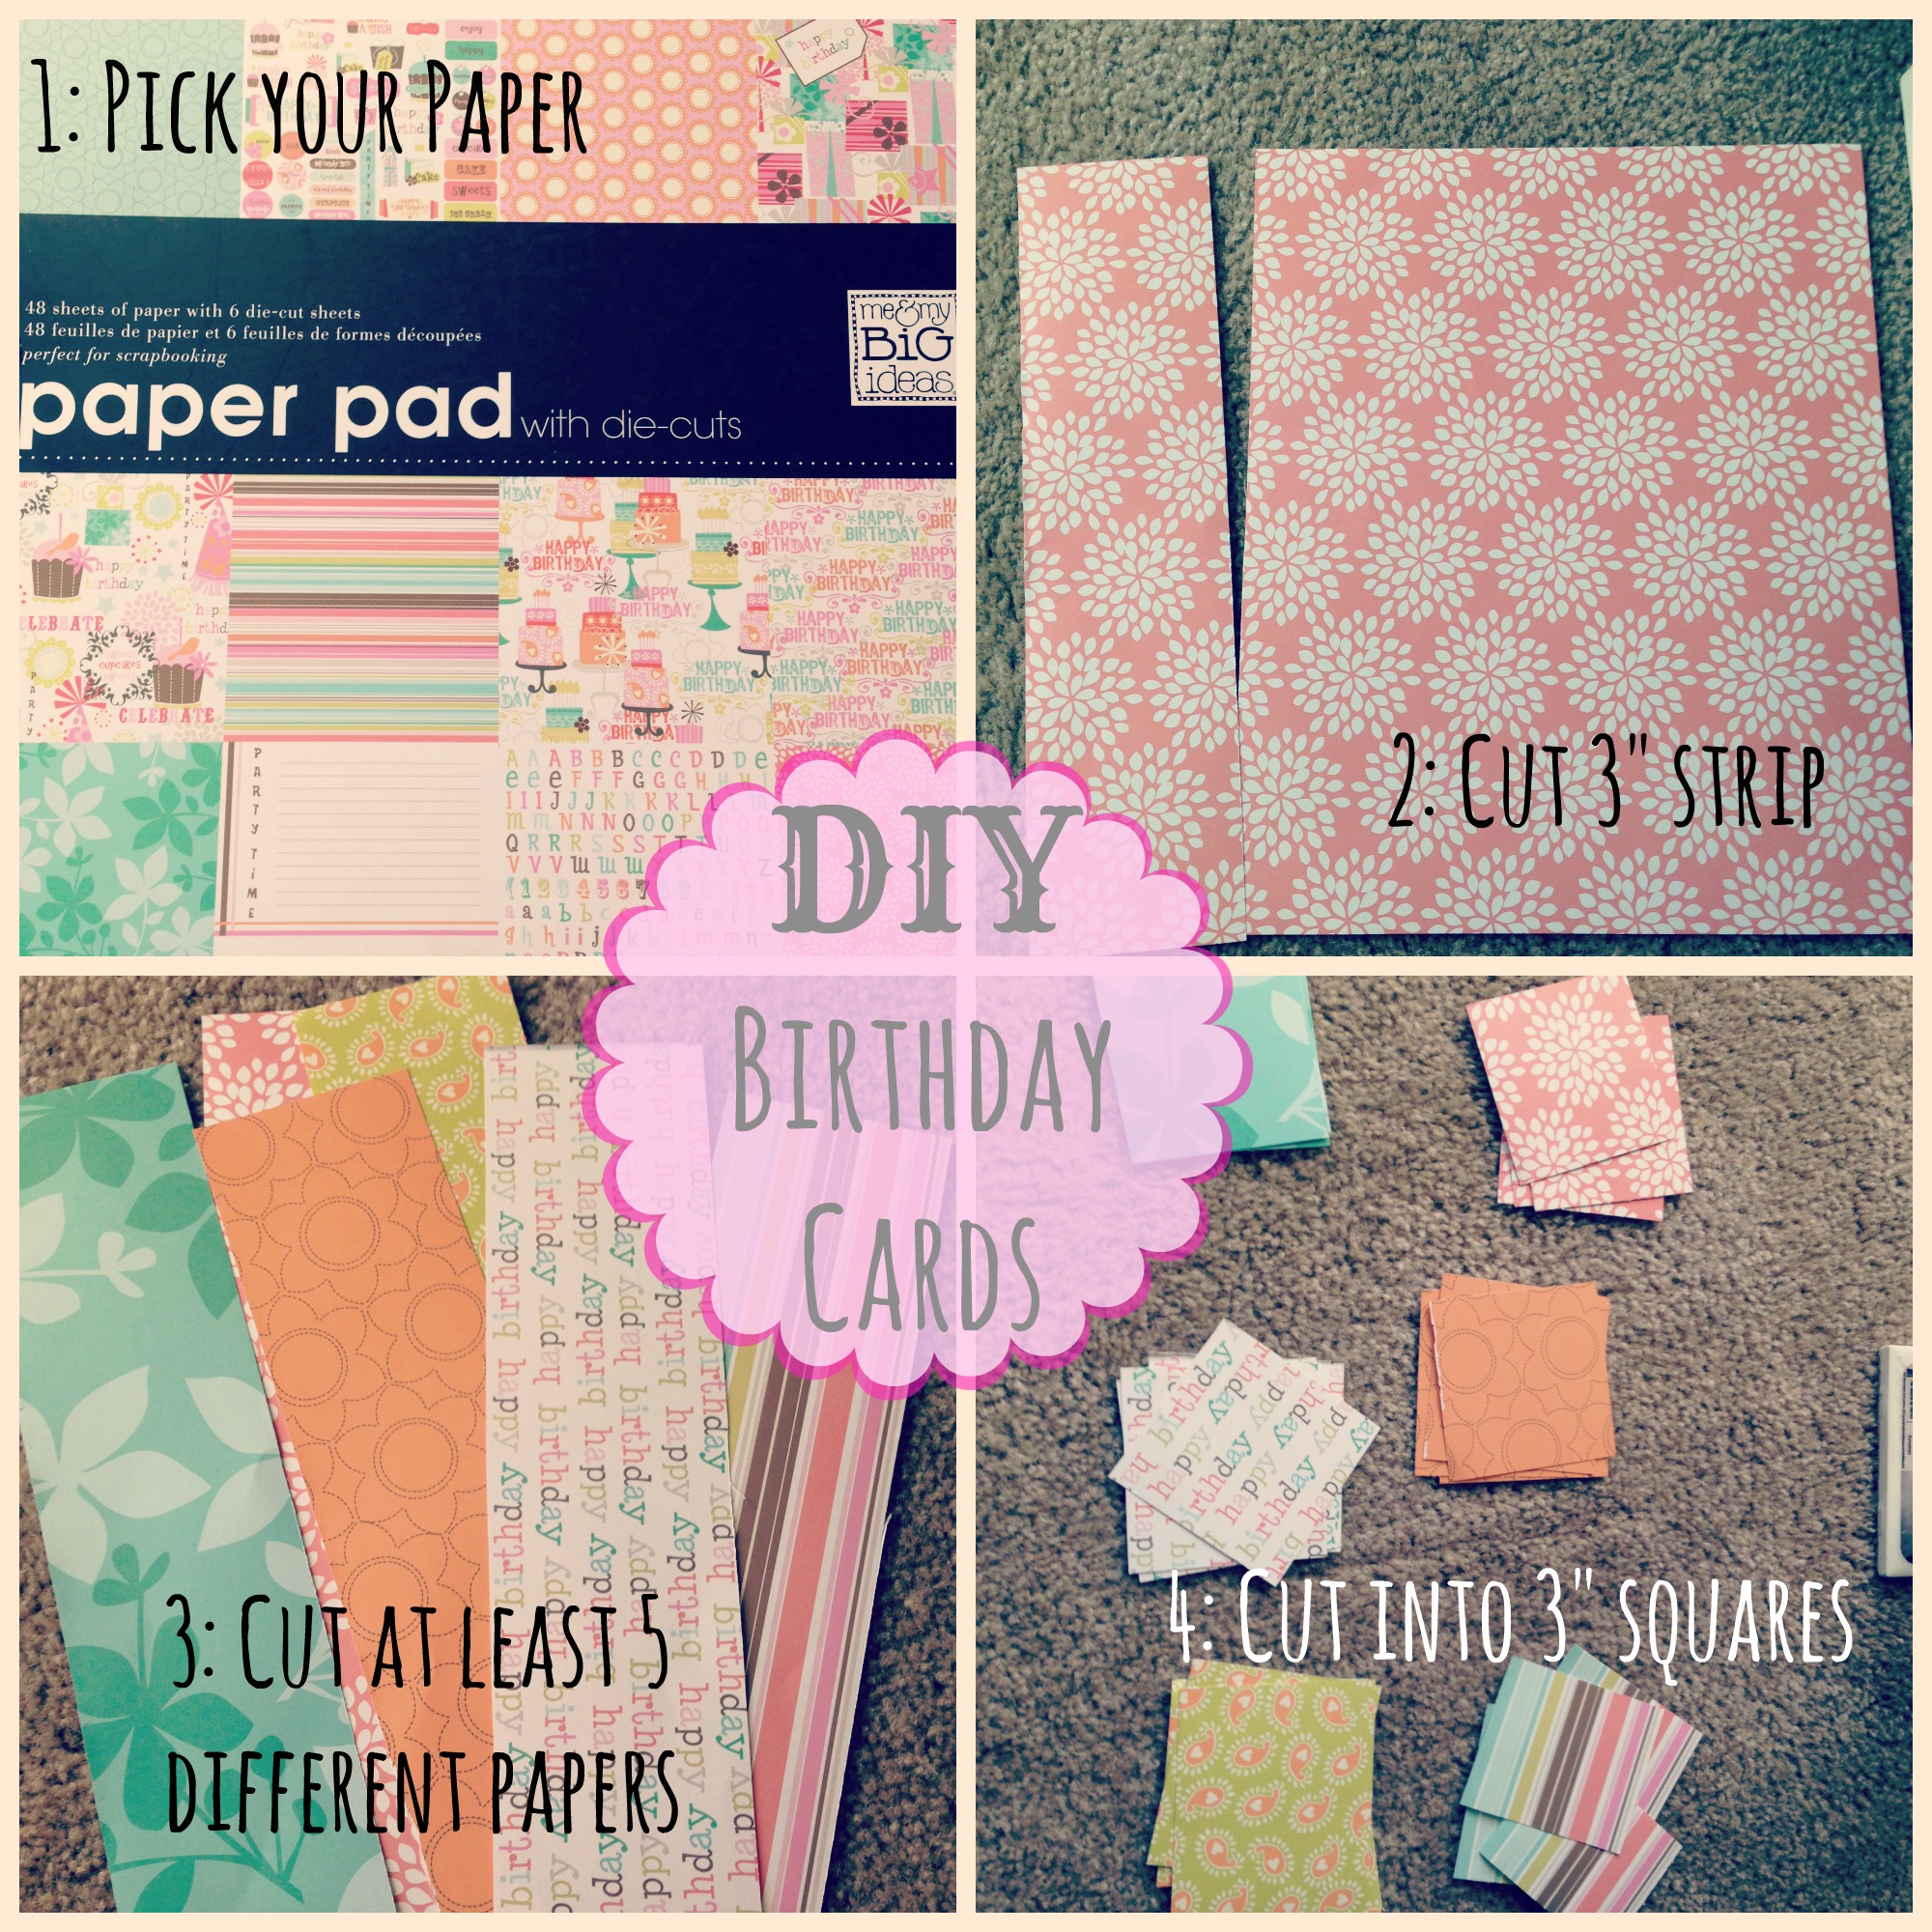
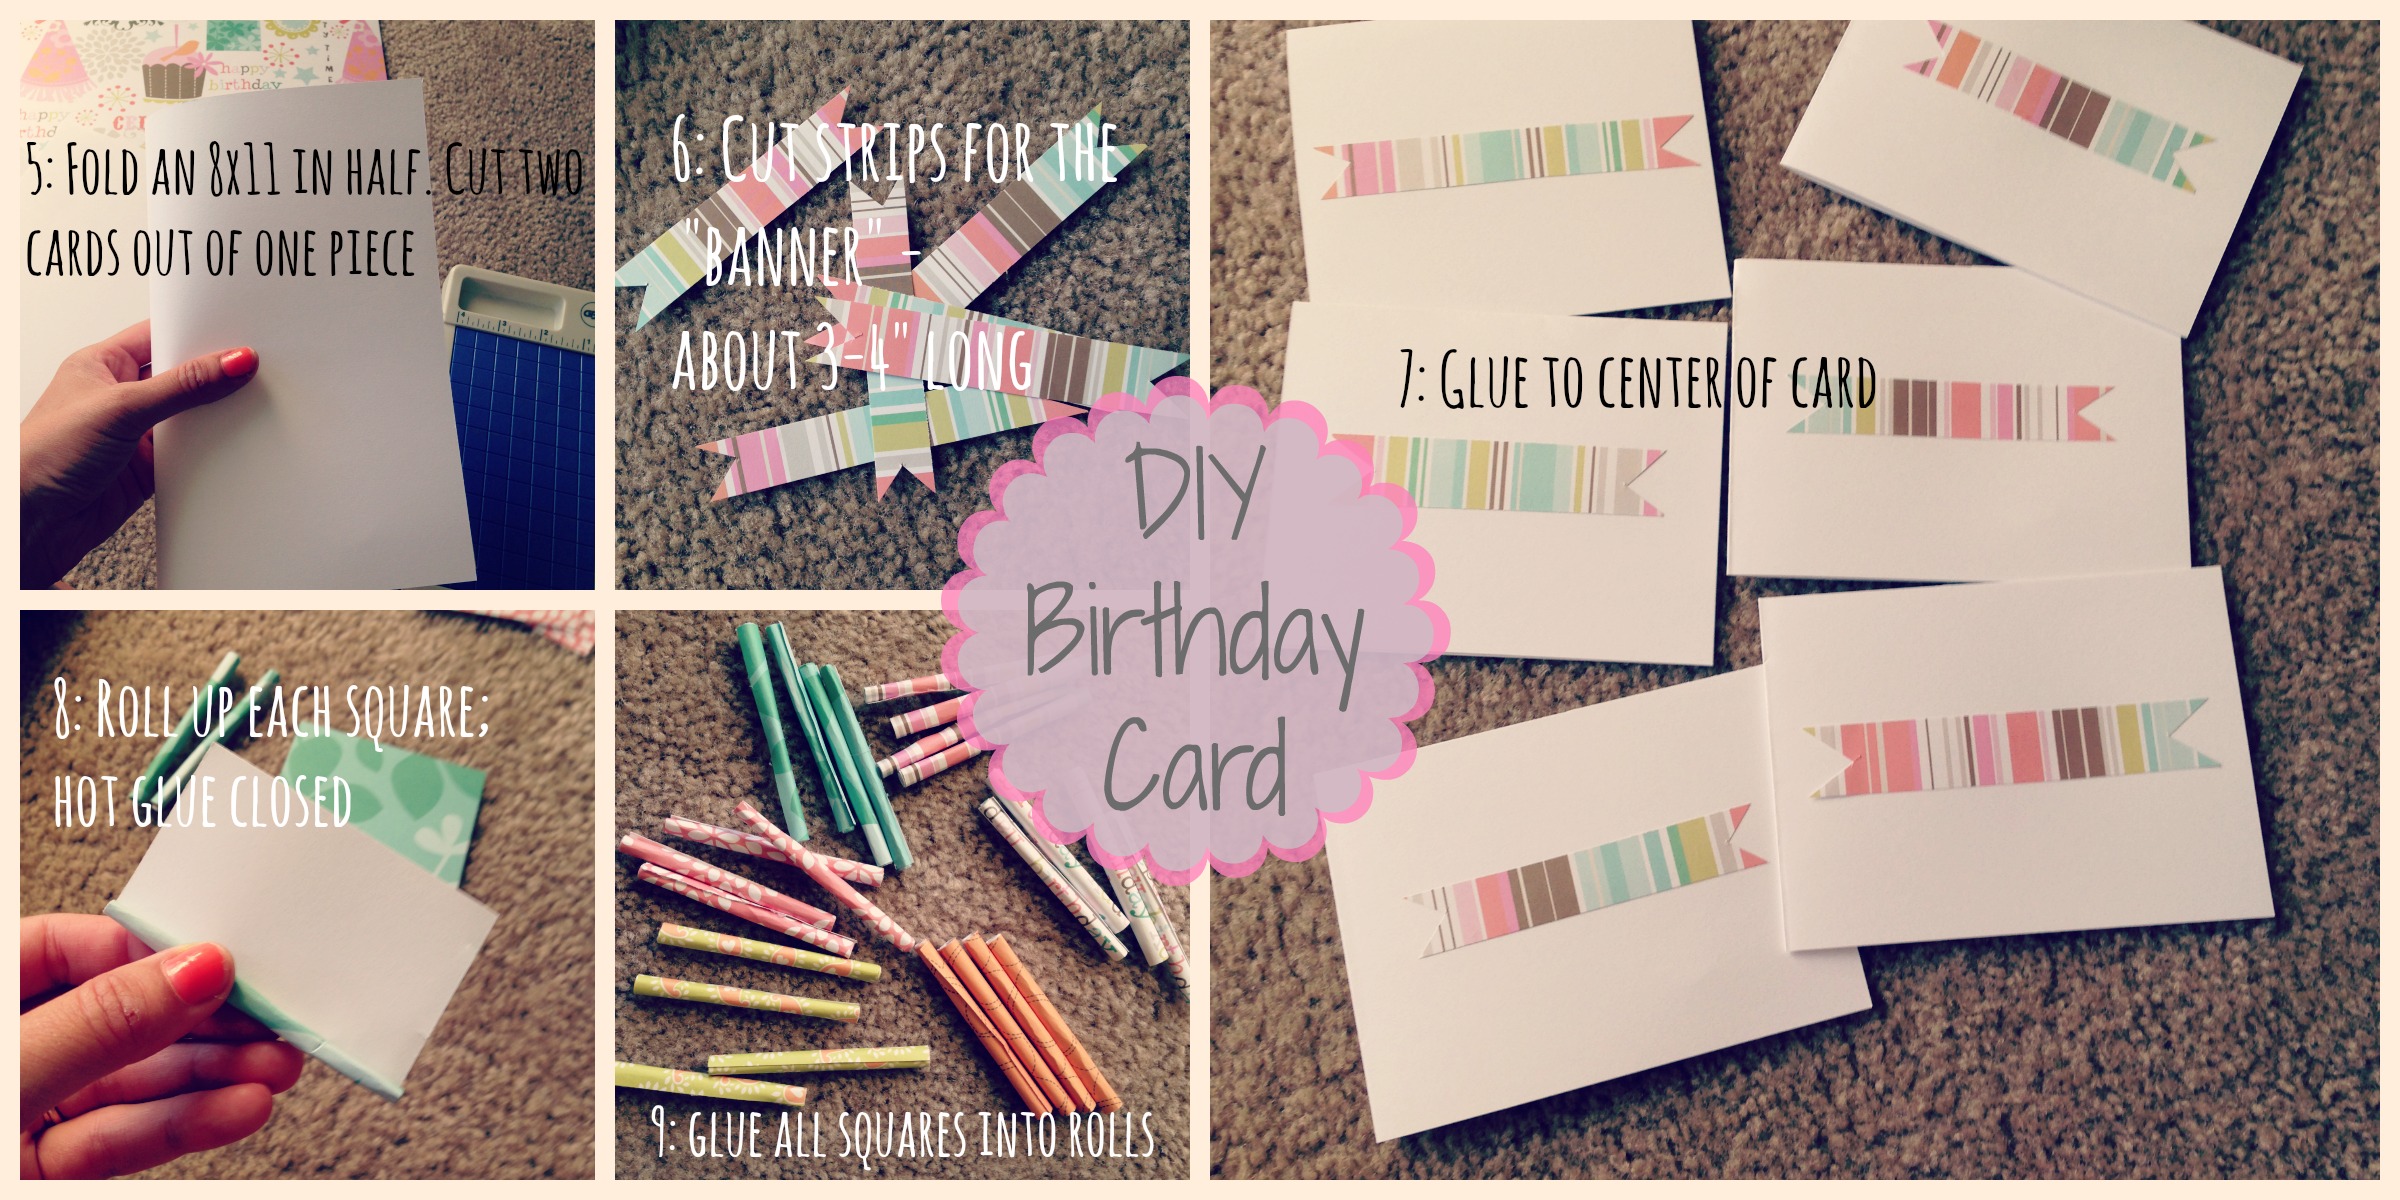
I know that I labeled all my photos, but there is one step I need to add in the beginning (and it is by far the most important one). Step One: Make yourself a drink. Then follow all other steps. Trust me.DIY Birthday Candle Cards // Birthday Cards // Rae of SparklesFor the remaining steps, you may have to enlarge the photo to read…DIY Birthday Candle Cards // Birthday Cards // Rae of SparklesSteps Not Pictured

Step 10: Use hot glue to glue about 7-9 rolls to each card. Whatever looks best to you. Some need more than others.

Step 11: Cut a half inch piece of twine, dab a bit of hot glue in the top of one roll, and stick twine inside.

Voila! You’re done with your birthday cards! 🙂DIY Birthday Candle Cards // Birthday Cards // Rae of Sparkles

Share this:

  • Email a link to a friend (Opens in new window) Email
  • Print (Opens in new window) Print
  • Tweet

Like this:

Like Loading…
Birthday's, DIY

30 Years Young!

6.02.2014

photo 2-1My husband is crafty too! Who knew?!

I knew that he had been up to something of a crafty nature (I would call it a woman’s intuition – he would call it snooping) before my birthday, but was not expecting something so touching! He probably had help from his sister, but for now I’ll let him have the credit.

For my birthday, my husband contacted all of my closest friends and family, asking them to write me a letter for my 30th birthday. The letters came from people all over the country, as far away as friends in Florida. They each wrote me a letter, and some included photos as well. My husband put them together into a book and if they didn’t send a photo, he found one to include.

When I opened this gift on my birthday, I couldn’t read it right away for fear of tears. Don’t judge, I was about to go out for a nice fancy shmancy meal and didn’t want my make-up to run. So when I got home afterwards, a few chardonnay’s later (probably not much better), I sat and read through my book. It was the most incredibly thoughtful gift he could have given me, and I loved it. He even included a “letter” from our adorable daughter…our cat Lucy. Don’t judge. We are cat people. And Lucy is amazing. 😉PicMonkey Collage

He made my book on Walgreens.com, you can find the information here.

You can also create a book like this on any of the fun photo sites like Snapfish or Shutterfly. And they all have really good discount codes to use if you do it at the right times! 🙂

Share this:

  • Email a link to a friend (Opens in new window) Email
  • Print (Opens in new window) Print
  • Tweet

Like this:

Like Loading…
« Previous Page
Next Page »
About Me

About Me

Hi Mamas! My name is Shauna, a 30-something (big emphasis on the 'something') new mama and wife living in Southern California. I've become a Stay At Home Mom to Sawyer, and I would do it forever if I could! I'm originally from Wisconsin and am a total Cheesehead! I'm here to share DIY's, travel tips, and baby stuff I'm sure!

Follow Us on Instagram!

stayinghomesawyer

Save for later. PS: This is my husbands rendition Save for later.

PS: This is my husbands rendition of a “Sexy Willy Wonka.” You know, because being Aladdin, Flynn Ryder, Prince Charming…he couldn’t just be a regular guy for one year. 🤣🤣
Don’t spend today wishing for tomorrow. Find five Don’t spend today wishing for tomorrow. Find five things every night that you’re thankful for, and BE thankful for them. So much of our lives are spent waiting for the next best thing when in reality, it’s sitting right in front of us.
If there’s anything I’ve learned in this life, it’ If there’s anything I’ve learned in this life, it’s to SLOW DOWN.

So much of life is spent going, going, going. Waiting for the next stage. Telling ourselves, “Once we get through this, things will be easier.” Once the kids are older. Once life settles down. Once we have more time. But what if we’re missing the whole point? Because the moments we’re so eager to get through ARE the moments.

Today is the important stuff. The ordinary days. The messy days. The little conversations, the giggles, the routines, the chaos, the moments that don’t feel significant while we’re living them. We spend so much time wishing for the next chapter that we forget we’re already living one we’ll someday wish we could go back to.

So slow down.

Be here.
Pay attention.
Let the moment take as long as it needs to.

Because someday, these will be the days we miss.

**And if you know us personally, you know why I had to jump on this social media trend**
This is your permission slip to let the crafts be This is your permission slip to let the crafts be messy. 

They don’t need to match your house. They don’t need to be Pinterest-worthy. They don’t need to be made with a neutral color palette and a Cricut. They just need to be theirs.

Because someday I’m probably going to miss the paper scraps, the glue everywhere, the questionable color combinations, and the little masterpieces I had no idea what to do with. Let them make the ugly craft. Let them make a mess. Let them create something that looks nothing like what you had in mind.

Childhood doesn’t have to be aesthetically pleasing to be beautiful.
When you stop to think about the fact that one day When you stop to think about the fact that one day all of her toys will be someone else’s toys, she’ll be heading off to college, and all I’ll be left with are these videos…
This is NOT a post to bash moms that are happy the This is NOT a post to bash moms that are happy their kids are going back to school. My neighbors and I commiserate all summer long about how long the days are, how frustrating the kids can be, how much they’re fighting, etc. 

But my days are always like that, and even though it’s exhausting and overwhelming at times, I wouldn’t trade it for the world. Even if I only have ONE moment like this a day, it’s one moment a day I could miss out on if they were in a traditional school. 

So here’s to whatever choice you are making in regards to your kids education. What’s best for YOU is most important. And what’s best for us is this.
I honestly never thought I’d be the mom saying yes I honestly never thought I’d be the mom saying yes
 to slime... but here we are.

The difference? This isn’t just a container of slime
 to squish around. The Slime Prank Lab by @CrunchLabs
turns it into an activity. We spent the afternoon mixing the slime, experimenting with different textures, and (of course) testing out the ridiculously funny booger and fart pranks. 🤣

My girls were completely entertained, and I loved watching them create, experiment, and laugh together. It feels like pure fun for the kids, but there’s actually some pretty cool science and engineering behind it all, plus Mark Rober walks you through even more with the QR code inside the kit.

Who in your family would be the first prank target? 
#sponsored #crunchlabs @moosetoys_
I’m about as outdoorsy as an overwater bungalow in I’m about as outdoorsy as an overwater bungalow in Tahiti can be.

#tahiti
A core memory I didn’t know I’d be making… This w A core memory I didn’t know I’d be making…

This weekend at church, my daughter got to light the candles for the first time. At the end of the service, when she went up on her own to extinguish them, proud tears dropped from my eyes. And as I looked around at others, I noticed I wasn’t the only one. 

If you had asked me in my early to mid twenties, I wouldn’t have imagined how much this community, this faith, and these little traditions would come to mean to our family. There was a season of my life, long before I became a mom, where I drifted away from actively going to church. Now, getting to watch my girls grow up surrounded by faith, love, and a church family who knows them and celebrates them feels like such a gift.
Follow on Instagram


Whatcha Looking For?

Recent Posts

  • Baby on Board Baby Shower
  • Dalmatian Party
  • 14 Things I Love About You
  • Purple Minnie Mouse
  • Surfing Into 6

Categories

  • Birthday's
  • DIY
  • Holidays!
  • Home Decor
  • Lifestyle
  • Parenting
  • Party Planning
  • Products I Love
  • Travel
  • Uncategorized
  • Wedding
2026 StayingHomeSawyer. All Rights Reserved. Design by SkyandStars.co
Back Top

Copyright © 2026 · YOON Theme on Genesis Framework · WordPress · Log in

Loading Comments...
%d