• About
  • Social Media
  • DIY
  • Holidays
  • Travel
  • Lifestyle

Staying Home Sawyer

Real Life Living on a Real Life Budget

DIY, Holidays!

Easy Valentine’s Day Cards

1.28.2014

After making a whole set of Valentine’s to hand out at the office, I had to make actual cards to send to the fam. These are the easiest Valentine’s cards to make, and they are adorable and handcrafted. Perfect to send to grandma (gets me on her good side! I’m definitely the favorite).

First off, these are the supplies you will need:

  • Brown cardstock
  • Colored pattern cardstock (your choice, anything “Valentine-y”)
  • Doilies
  • Special Scissors (Don’t have to be the same, and could even be done with normal scissors)
  • Twine (I bought the pictured roll in a 3pk at the Dollar Tree!! – SCORE!)Easy DIY Valentine's Day Cards From here the steps are easy:
  • Step One: Fold the cardstock in half landscape way, then cut down the middle to make two cards.
  • Step Two: Trace hearts / Cut out with scissors. You can make your hearts any size you’d like!
  • Step Three: Cut holes to tie a twine bow (I used arrows to show them on the photo)
  • Step Four: Glue doilies onto card, fold sides over into the card middle or cut off.
  • Step Five: Glue heart to doilies! Voila! You’re done!

PicMonkey-22222I like to make several at a time so that it doesn’t take me as long. Your finished product will look something like this:DIY Valentine's Day Cards Easy

Share this:

  • Email a link to a friend (Opens in new window) Email
  • Print (Opens in new window) Print
  • Tweet

Like this:

Like Loading…
DIY, Holidays!

Easy Bulk Valentine Cards!

1.24.2014

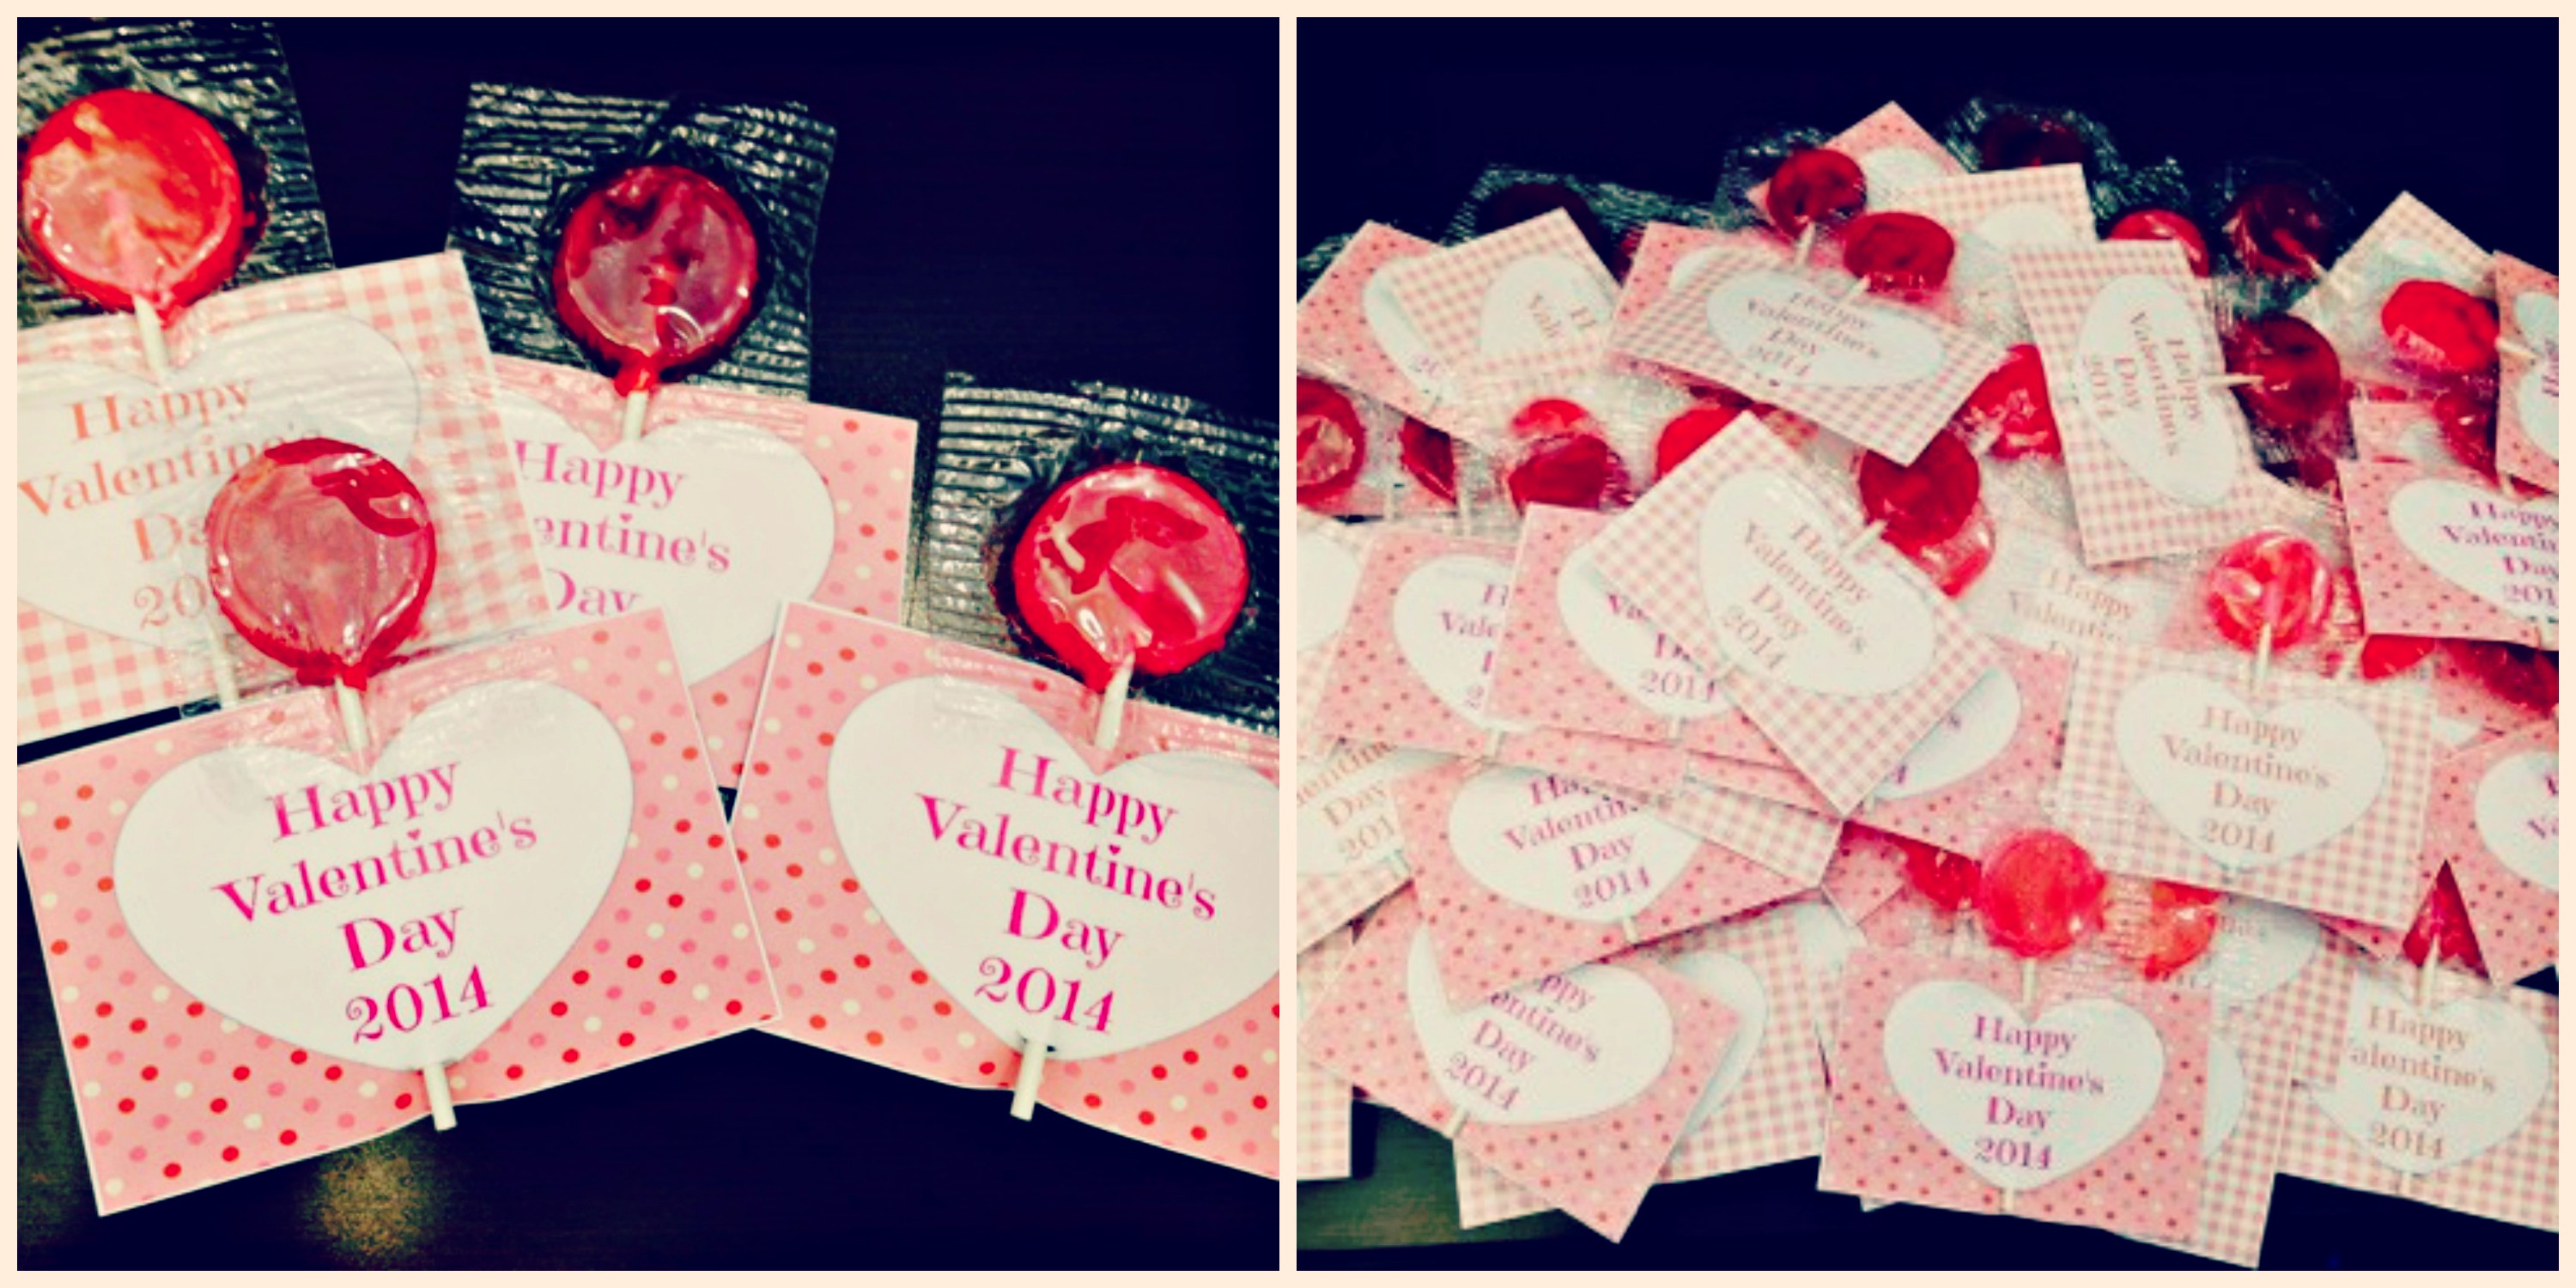
It may be slightly obvious by now how much I love holidays! I like to celebrate them at work too, to give co-workers a little something to brighten up their days. Because we have almost 100 local employees at my branch, it can be tough to do something for everyone without spending a fortune. This year for Valentine’s Day, I did something VERY simple and cheap, but hopefully will put smiles on the faces of our employees!

I started with some simple suckers, you can find these at the Dollar Tree. Any suckers will work, the cheaper the better! Remember, this is more about the thought, and less about spending a fortune!

Then I designed some simple Valentines, courtesy of PicMonkey (I highly recommend getting used to this site, it is so easy and fun to use). Because my company can not officially support any holidays, I couldn’t add my company’s name on the bottom, so I kept it simple. You can print my tags, or make some of your own! Find my tags here. I used generic white cardstock to give it a thickness, so it wasn’t too flimsy.VDAYAfter printing and cutting them all out, you have to cut holes for the sucker stick. These should be as small as possible, the bigger the hole, the more the sucker will slip out (if this happens, you can just add a piece of tape to the back). I recommend 1/2 centimeter or less. You need a hole on the bottom, and a hole on the top. Then just slide in the sucker, and it’s complete! You have a cute little Valentine to distribute at work, school, or even to neighbors!DIY Bulk Valentine's Day Cards

Share this:

  • Email a link to a friend (Opens in new window) Email
  • Print (Opens in new window) Print
  • Tweet

Like this:

Like Loading…
Birthday's, DIY

DIY Birthday Box

1.22.2014

 Sometimes you want to send something a little special to that special someone! But sometimes your bank account doesn’t want it to be “too special.” So here’s a simple solution to your problem: Send a birthday box!

I’ve sent different variations of birthday boxes. I ALWAYS use a USPS Flat Rate box, because it’s cheaper and you can send more for the price. Sometimes I’ve used the small box and just sent birthday party “supplies,” which can brighten anyone’s day. Today though, I’ll show you a little more upgraded birthday box.

I have twin sisters who LOVE to celebrate their birthday (I’m with them, who doesn’t?!). But because I live far away from them, I wanted to help them celebrate in a way I couldn’t personally. First, I picked up different size Flat Rate boxes at USPS (the best thing about these boxes, is they’re FREE to take! So you don’t pay until you send the box). I took two different medium boxes, figuring it would depend what I put in before I could choose (I ended up with the square medium box).

Then I went shopping! The best part! I picked up birthday supplies: birthday party hats, birthday streamers, birthday balloons, whatever you can find. Think: Whatever would be at a birthday party! I picked up candy, cupcakes, cookies, liquor (for those over 21!), and some random treats.

When I got home, I got to work! I used Modge Podge to stick scrapbooking paper to the inner box sides (I chose this for this box because they are girly girls! However, it can be fun to use general wrapping paper on the inside instead of designed paper). Then I cut up some sheets of birthday sayings for “confetti” of sorts (also can get this off birthday wrapping paper). I also made little pieces of curly cues from the wrapping paper I had. Then I filled the box!Birthday Box
Then you have the finished product! Close it up and send it in the mail! Another great thing about the flat rate boxes is that they will arrive in 2-3 days, which also helps to keep the pastries fresh! 🙂IMG_2066

Share this:

  • Email a link to a friend (Opens in new window) Email
  • Print (Opens in new window) Print
  • Tweet

Like this:

Like Loading…
DIY, Holidays!

DIY Cheap Valentine’s “Mantle”

1.14.2014

 Valentine's Day Mantle // Rae of SparklesOne of my favorite things to do is decorate for the holidays! I usually start the day after one holiday ends, and I tend to go a little crazy. This year for Valentine’s Day, I wanted to decorate with an easy, cheap “mantle” piece (since we don’t have a real mantle, I make do with what I have). My first step was visiting The Dollar Tree, which just so happens to be one of my favorite stores, to pick up a few things. I started with the following:

1 8X10 Frame

1 5X7 Frame

1 4X6 Frame

1 3.5X5 Frame

2 Candlestick holders

2 Votive Candle Holders

1 Heart Garland

Total: $9

Valentine's Day DIY(For your best results, try to find frames with the most detail. Most of the time, these are the ugliest ones in the store! But when you’re finished, they turn out to be the prettiest)

Then I picked up some spray paint, at my local Home Depot (this would be cheaper at Target or Wal-Mart). Pick up any color you would like, red/pink/white/gray to match your theme. This shouldn’t cost you more than a few dollars, mine was $4.

I mixed these things with a few items I already own, such as glass glue (E-600 works), and a bell jar. Both of these items can be picked up at Target/Walmart/Michaels. I glued the votive holders to the candlesticks. I tend not to let things dry long enough, so for the best result, these will need to sit for 24 hours (I didn’t even wait an hour).

For an added touch, I used a heart sticker to cover a side of the bell jar, so when painted, created an illuminary. I painted all the items red, let them dry, and then arranged them with a few pieces I already had around the house. Any frames/candlesticks/candles in the color pattern would work great. I added two candlesticks and a frame. I printed a Valentine’s Day subway art print from Pinterest (here is a link to subway art), and created one of my own as well. Lastly, I printed a few black & white photos for the remaining frames, and voila! My total was only $13, but if you didn’t have glass glue at home, you may spend a little more. You should be able to create this whole mantle-piece for less than $20, even with no supplies at home.

Share this:

  • Email a link to a friend (Opens in new window) Email
  • Print (Opens in new window) Print
  • Tweet

Like this:

Like Loading…
« Previous Page
Next Page »
About Me

About Me

Hi Mamas! My name is Shauna, a 30-something (big emphasis on the 'something') new mama and wife living in Southern California. I've become a Stay At Home Mom to Sawyer, and I would do it forever if I could! I'm originally from Wisconsin and am a total Cheesehead! I'm here to share DIY's, travel tips, and baby stuff I'm sure!

Follow Us on Instagram!

stayinghomesawyer

Save for later. PS: This is my husbands rendition Save for later.

PS: This is my husbands rendition of a “Sexy Willy Wonka.” You know, because being Aladdin, Flynn Ryder, Prince Charming…he couldn’t just be a regular guy for one year. 🤣🤣
Don’t spend today wishing for tomorrow. Find five Don’t spend today wishing for tomorrow. Find five things every night that you’re thankful for, and BE thankful for them. So much of our lives are spent waiting for the next best thing when in reality, it’s sitting right in front of us.
If there’s anything I’ve learned in this life, it’ If there’s anything I’ve learned in this life, it’s to SLOW DOWN.

So much of life is spent going, going, going. Waiting for the next stage. Telling ourselves, “Once we get through this, things will be easier.” Once the kids are older. Once life settles down. Once we have more time. But what if we’re missing the whole point? Because the moments we’re so eager to get through ARE the moments.

Today is the important stuff. The ordinary days. The messy days. The little conversations, the giggles, the routines, the chaos, the moments that don’t feel significant while we’re living them. We spend so much time wishing for the next chapter that we forget we’re already living one we’ll someday wish we could go back to.

So slow down.

Be here.
Pay attention.
Let the moment take as long as it needs to.

Because someday, these will be the days we miss.

**And if you know us personally, you know why I had to jump on this social media trend**
This is your permission slip to let the crafts be This is your permission slip to let the crafts be messy. 

They don’t need to match your house. They don’t need to be Pinterest-worthy. They don’t need to be made with a neutral color palette and a Cricut. They just need to be theirs.

Because someday I’m probably going to miss the paper scraps, the glue everywhere, the questionable color combinations, and the little masterpieces I had no idea what to do with. Let them make the ugly craft. Let them make a mess. Let them create something that looks nothing like what you had in mind.

Childhood doesn’t have to be aesthetically pleasing to be beautiful.
When you stop to think about the fact that one day When you stop to think about the fact that one day all of her toys will be someone else’s toys, she’ll be heading off to college, and all I’ll be left with are these videos…
This is NOT a post to bash moms that are happy the This is NOT a post to bash moms that are happy their kids are going back to school. My neighbors and I commiserate all summer long about how long the days are, how frustrating the kids can be, how much they’re fighting, etc. 

But my days are always like that, and even though it’s exhausting and overwhelming at times, I wouldn’t trade it for the world. Even if I only have ONE moment like this a day, it’s one moment a day I could miss out on if they were in a traditional school. 

So here’s to whatever choice you are making in regards to your kids education. What’s best for YOU is most important. And what’s best for us is this.
I honestly never thought I’d be the mom saying yes I honestly never thought I’d be the mom saying yes
 to slime... but here we are.

The difference? This isn’t just a container of slime
 to squish around. The Slime Prank Lab by @CrunchLabs
turns it into an activity. We spent the afternoon mixing the slime, experimenting with different textures, and (of course) testing out the ridiculously funny booger and fart pranks. 🤣

My girls were completely entertained, and I loved watching them create, experiment, and laugh together. It feels like pure fun for the kids, but there’s actually some pretty cool science and engineering behind it all, plus Mark Rober walks you through even more with the QR code inside the kit.

Who in your family would be the first prank target? 
#sponsored #crunchlabs @moosetoys_
I’m about as outdoorsy as an overwater bungalow in I’m about as outdoorsy as an overwater bungalow in Tahiti can be.

#tahiti
A core memory I didn’t know I’d be making… This w A core memory I didn’t know I’d be making…

This weekend at church, my daughter got to light the candles for the first time. At the end of the service, when she went up on her own to extinguish them, proud tears dropped from my eyes. And as I looked around at others, I noticed I wasn’t the only one. 

If you had asked me in my early to mid twenties, I wouldn’t have imagined how much this community, this faith, and these little traditions would come to mean to our family. There was a season of my life, long before I became a mom, where I drifted away from actively going to church. Now, getting to watch my girls grow up surrounded by faith, love, and a church family who knows them and celebrates them feels like such a gift.
Follow on Instagram


Whatcha Looking For?

Recent Posts

  • Baby on Board Baby Shower
  • Dalmatian Party
  • 14 Things I Love About You
  • Purple Minnie Mouse
  • Surfing Into 6

Categories

  • Birthday's
  • DIY
  • Holidays!
  • Home Decor
  • Lifestyle
  • Parenting
  • Party Planning
  • Products I Love
  • Travel
  • Uncategorized
  • Wedding
2026 StayingHomeSawyer. All Rights Reserved. Design by SkyandStars.co
Back Top

Copyright © 2026 · YOON Theme on Genesis Framework · WordPress · Log in

Loading Comments...
%d